Updated April 4, 2002
You can always get the latest version of this document from:
http://cambuca.ldhs.cetuc.puc-rio.br/multiuser/g450.html
Disclaimer
This document is provided AS IS. I have no afiliation with neither RedHat or Matrox. Although effort has been made tring to make an easy step by step guide, you must realize this is a HACK and I can't guarantee it will work for you. If you want to do it be prepared for a lot of reboots, freezing the machine and some trial and error. Also reading the original document (not Matrox specific version) is highly recomended.
Also note that i don't have resources and time to provide support on this howto for every user. Of course you may send comments, success stories and questions, but don't expect much more information than what i have already wrote here....
Introduction
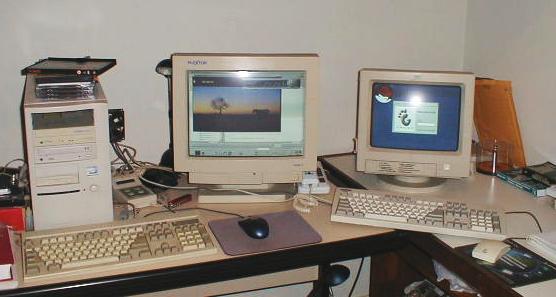
This document presents a way to share a single computer between two users
simultaneously. Each user will have it's own instance of the xserver, that
is, a completely independent desktop with monitor, keyboard and mouse.
Requirements
1) Install a fresh RedHat 7.2 system
You must connect all hardware and do a new RedHat 7.2 instalation.
The following instructions may work with already installed systems or other linux distributions, but they were only tested this way.
Don't enable the graphical boot screen. If you did it, change the following line at /etc/inittab...
id:5:initdefault:
...into...
id:3:initdefault:
2) Upgrade the kernel
Provided kernels for RedHat Linux 7.2 do not have support to G450 framebuffer
device. I recompiled the standard RedHat RPM with an updated version of
matroxfb subsystem to solve that problem. So you must download and install
one of these RPMS, optimized for your CPU.
You should also need to upgrade your modutils package as provided by RedHat updates.
Don't get fooled by the kernel version number (2.4.9) when the latest version
is something like 2.4.18+. This is a highly patched kernel from RedHat, very
stable and fast, including some recent addictions to main linux tree like
Pentium-4 hiperthreading support.
3) Configure framebuffer devices
Framebuffer devices are the abstraction layer needed to run two instances
of XFree86 using the same hardware. Try these lines at your console, and
if they work add them to the end of file /etc/rc.local:
modprobe matroxfb_g450

modprobe matroxfb_crtc2

fbset -fb /dev/fb0 "1024x768-60" -depth 16

fbset -fb /dev/fb1 "800x600-60" -depth 16
The fbset utility is provided on second RedHat 7.2 CD. The screen configuration
(resolution and depth) must match the same values used on XF86Config-4. For
now, the above configuration should be good for about any system, but you
will probably want to tune them later.
4) Prepare the USB keyboard
If everything went fine during installation the usb keyboard should have
being detected and installed. Try pressing anything there, it should seen
as it came from the first keyboard. Unfortunately this is not what we want,
but a separated behaviour instead.
Edit file /etc/rc.d/rc.sysinit, search for this line:
action $"Initializing USB keyboard: " modprobe keybdev
change where it reads "keybdev" for "evdev"
Edit file /etc/hotplug/usb.handmap, search for this line:
keybdev 0x0380 0x0000 ....
change where it reads "keybdev" for "evdev".
Reboot your system. The usb keyboard shouldn't generate any keys at the console anymore. Now we must find the device name needed to access it, this is usually /dev/input/event0 or /dev/input/event1 depending on what other usb equipment you have.
Try this on the console:
cat /dev/input/event0
Press something at the usb keyboard, you should see some garbage on screen. If you don't, try again for event1, event2, etc. Write down the device name which works.
5) Install patched xservers
Download both XFree86-4.1.0-1st.gz and XFree86-4.1.0-2nd.gz. Install them with these commands:
gunzip XFree86-4.1.0-1st.gz

gunzip XFree86-4.1.0-2nd.gz

chmod +x XFree86-4.1.0-*

cp XFree86-4.1.0-* /usr/bin/X11
6) Configure XFree86
Download this file saving it as /etc/X11/XF86Config-4.
You must edit it to make sure the hardware configuration is right. In special, don't forget to change the line:
Option "Device" "/dev/input/event1"
To the device name found at step (4).
Also mouse configuration will probably need some adjusts. Mine is a PS2 mouse and a serial mouse on second port.
When in doubt, the command "man XF86Config" shows a compreensive help of almost every parameter.
7) Test XFree86 configuration
You may want to test XF86Config-4 settings using the following lines (one
at a time):
XFree86-4.1.0-1st -layout layout0 vt07

XFree86-4.1.0-2nd -layout layout1 vt07
This way errors could be fixed (like wrong mouse port) more easily as they
are reported on console. Some more compreensive testing is available from
the original multiuser document.
8) Downgrade gdm
This may sound a bit strange, but the only display manager i could get
to work with dualhead configuration was
gdm-2.0beta2-45.i386.rpm from RedHat Linux 7.1. To install it this
command is needed:
rpm -U --oldpackage gdm-2.0beta2-45.i386.rpm
9) Configure gdm
Make sure you are using gdm on your computer by adding this line...
DISPLAYMANAGER="gdm"...to file /etc/sysconfig/desktop.
Edit /etc/X11/gdm/gdm.conf. going to the end of file, [servers] section
should be:
[servers]

  1=/usr/bin/X11/XFree86-4.1.0-1st -layout layout0 vt07

  0=/usr/bin/X11/XFree86-4.1.0-2nd -layout layout1 vt07
10) Test gdm
Running "gdm" from the console should initialize both monitors showing the login screen. If it doesn't you must do trial and error tests with gdm config. The above lines worked for me, but you may test changing the order they show on gdm.conf, exchange the 0= and 1= parameters and/or add a "-delay" option to the xserver (this will make one of them wait 10 seconds before initializing).
11) Enable graphical boot
Edit /etc/inittab to use init level 5 as default.
id:5:initdefault:
(have fun!)
Contact
Miguel Freitas <
miguel@cetuc.puc-rio.br>
Center for Telecommunications Studies of the
Catholic University of Rio de Janeiro (CETUC/PUC-Rio)
Brazil
please send your spam to this
email